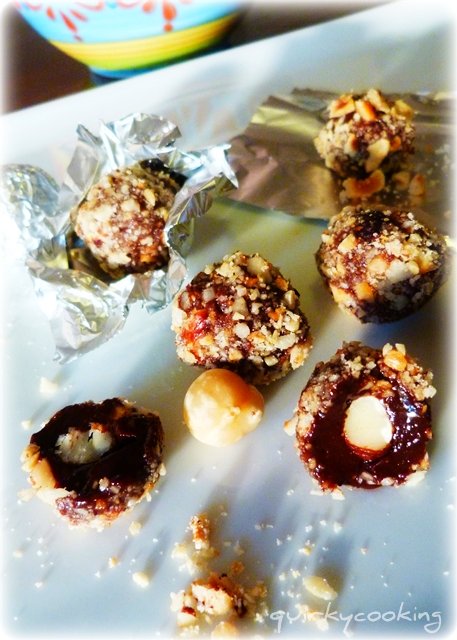
I've been meaning to post this recipe since before Christmas, as this was one of my Christmas treat ideas - homemade Ferrero Rochers that are gluten free and dairy free! But in the holiday rush, they never actually got made. Well... I got a few made, but I ate them as quick as I made them, so there never were enough to put in the kid's Christmas stockings, or to take to the parties I intended to take them to! *grins sheepishly*
At least they're pretty healthy. That's my excuse anyway.
My recipe is simply a homemade nutella type chocolate mixture (based on my hazelnut chocolate spread recipe), molded around a roasted hazelnut and coated in crushed, roasted hazelnuts. I didn't bother with the biscuit layer - too tricky, and besides, I wanted them to be gluten free. And I never got around to coating them with chocolate - maybe next time. I thought they were chocolatey enough without the extra chocolate coating, and besides, I wanted to hurry up and eat them so I didn't want to take the time for an extra step! But if you're feeling industrious, and you have the self-control to not eat them all before you actually get the chocolate ready to dip them in, here's my recipe for homemade chocolate, which I think would work best because it's quite thin before it's set, so it would be easy to coat the balls with.
Homemade Ferrero Rocher Chocolates
(Dairy Free & Gluten Free!)
First you need to roast the hazelnuts (if they're not already roasted):
- Spread about 3 cups of raw hazelnuts on a baking tray (in a single layer) and roast at 180 degrees C for about 10-15 minutes, stirring once or twice, until slightly browned. (I buy my nuts bulk from Trumps through a co-op, so it's not so expensive.)
Then once they're cool, rub the skins off as best you can, either with your hands, or in a tea towel. Discard skins.
Take a third of the nuts and set them aside. Roughly chop the other two thirds in the Thermomix by pulsing a few times with Turbo speed. Check in between pulses so you don't overdo it.
Now make the hazelnut chocolate for the centre:
1. Grind in Thermomix on speed 9 for 10 seconds:
- 90g Rapadura
2. Add and grind on speed 9 for 10 seconds:
- 60g roasted hazelnuts
3. Then add and grind again for 10 seconds:
- 50g good quality, dairy free dark chocolate broken into pieces
(70-85% cocoa dairy free chocolate - I use Lindt)
4. Add and heat for 6 minutes, 60 degrees, speed 3:
- 50g good quality, dairy free dark chocolate broken into pieces
(70-85% cocoa dairy free chocolate - I use Lindt)
4. Add and heat for 6 minutes, 60 degrees, speed 3:
- 20g cacao powder (or good quality cocoa)
- 50g rice/almond milk or other milk
- 70g coconut oil (I use a flavourless variety for this recipe)
5. Scrape the chocolate mixture into a bowl and refrigerate for a few hours until very firm. (Or pop it in the freezer if you're in a hurry!)
Once your chocolate has set, you can make the balls. You need to work quick, as the chocolate gets too soft to work with after a while.
5. Scrape the chocolate mixture into a bowl and refrigerate for a few hours until very firm. (Or pop it in the freezer if you're in a hurry!)
Once your chocolate has set, you can make the balls. You need to work quick, as the chocolate gets too soft to work with after a while.
Take a thin scoop of the chocolate mixture with a teaspoon, and put a roasted hazelnut on top. Mold the chocolate around the hazelnut to form a rough ball.
Roll the balls in the crushed hazelnuts, squishing them into shape as you go. Place the balls on a plate or in a container, and keep them in the fridge as you make them. They do melt pretty quickly as I found out when trying to take photos of them... I got distracted with a phone call and came back to soggy chocolate balls. So I had to eat them. ;)
Roll the balls in the crushed hazelnuts, squishing them into shape as you go. Place the balls on a plate or in a container, and keep them in the fridge as you make them. They do melt pretty quickly as I found out when trying to take photos of them... I got distracted with a phone call and came back to soggy chocolate balls. So I had to eat them. ;)
Once they're firm, you could dip them in melted, raw dark chocolate if you like, then re-chill. I wrapped them in little squares of foil, but it's not really necessary - the nuts keep them from sticking together.
You can keep these in the fridge or freezer - they keep well for ages. That is, if they're well hidden!
You can keep these in the fridge or freezer - they keep well for ages. That is, if they're well hidden!


+(1).jpg)


.jpg)


0 komentar:
Posting Komentar